I. Introduction
A. What is LVT (Luxury Vinyl Tile/Plank)?
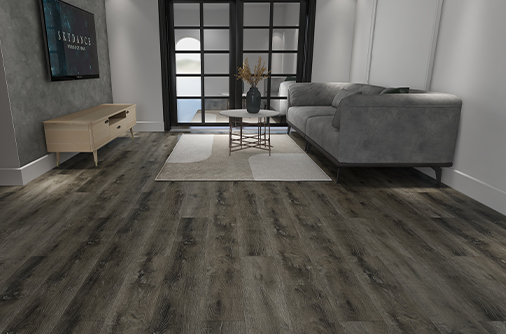
Luxury Vinyl Tile (LVT) and Luxury Vinyl Plank (LVP) have revolutionized the flooring industry, offering a highly versatile and aesthetically pleasing alternative to traditional materials like hardwood, ceramic tile, and stone. LVT is a multi-layered synthetic flooring product designed to mimic the look and feel of natural materials with remarkable realism. Its rapid rise in popularity is attributed to its durability, water resistance, ease of maintenance, and wide array of design options.
B. Defining Glue Down LVT
Among the various LVT installation methods, "glue down" refers to a specific technique where the vinyl planks or tiles are permanently adhered to the subfloor using a specialized adhesive. Unlike click-lock (floating) or loose-lay LVT, which rely on interlocking mechanisms or friction, glue-down LVT forms a strong, permanent bond with the underlying surface. This method provides exceptional stability and performance, making it a preferred choice for many applications.
C. Why Choose Glue Down LVT?
Choosing glue-down LVT often comes down to a desire for maximum stability, enhanced durability, and superior performance in demanding environments. Its robust adhesion minimizes movement, reduces sound, and offers excellent resistance to temperature fluctuations, making it a reliable long-term flooring solution.
D. Target Audience/Purpose of the Article
This article is designed for homeowners considering LVT, DIY enthusiasts looking for detailed installation guidance, and even contractors seeking a comprehensive overview of glue-down LVT's benefits and challenges. By the end of this guide, readers will have a thorough understanding of what glue-down LVT entails, its advantages and disadvantages, the installation process, and essential maintenance tips.
II. Advantages of Glue Down LVT Flooring
A. Superior Stability and Durability
The primary advantage of glue-down LVT lies in its unparalleled stability. The adhesive creates a strong, permanent bond between the LVT and the subfloor, virtually eliminating movement, gapping, and buckling. This makes it exceptionally durable and ideal for high-traffic residential areas and demanding commercial spaces where heavy footfall and rolling loads are common.

B. Enhanced Water Resistance
When installed correctly, the adhesive forms a barrier that significantly enhances the floor's water resistance. While LVT itself is highly water-resistant, the glue-down method prevents water from seeping underneath the planks, making it an excellent choice for moisture-prone areas such as kitchens, bathrooms, laundry rooms, and basements.
C. Excellent Repairability
One of the most practical benefits of glue-down LVT is its ease of repair. If an individual plank or tile becomes damaged, it can be carefully removed and replaced without disturbing the surrounding flooring. This targeted repair capability is a significant advantage over floating floors, where damage often necessitates replacing a larger section.
D. Better Acoustic Performance
Because glue-down LVT is fully adhered to the subfloor, it offers superior acoustic performance compared to floating floors. The solid bond helps to absorb sound, reducing hollow sounds, footfall noise, and sound transmission between floors, contributing to a quieter indoor environment.
E. Versatility in Design and Application
The glue-down method allows for greater design flexibility. Installers can create intricate patterns like herringbone, chevron, or custom designs that are difficult or impossible with floating systems. This makes glue-down LVT suitable for both residential and large-scale commercial applications where aesthetics and custom layouts are crucial.
F. Longevity and Warranty
Due to its robust installation, glue-down LVT typically offers a longer lifespan than other LVT types, often lasting 20-30 years or more with proper care. Manufacturers often provide extensive warranties for glue-down products, reflecting their confidence in the stability and durability of this installation method.
III. Disadvantages and Considerations of Glue Down LVT Flooring
A. Installation Complexity
Compared to click-lock LVT, glue-down installation is more complex and labor-intensive. It requires a higher level of skill, precision, and attention to detail. For many homeowners, professional installation is recommended to ensure proper adhesion and a flawless finish, which can add to the overall cost.
B. Critical Subfloor Preparation
The success of a glue-down LVT installation hinges on impeccable subfloor preparation. The subfloor must be perfectly smooth, clean, dry, and flat. Any imperfections, moisture, or debris will telegraph through the LVT over time, leading to visible flaws or adhesive failure. This often requires significant time and cost for leveling, patching, and moisture testing.
C. Permanent Installation
Once installed, glue-down LVT is a permanent fixture. While individual planks can be replaced, removing an entire glue-down floor is a difficult, time-consuming, and potentially messy process. This lack of easy removability should be a consideration if you anticipate frequent flooring changes.
D. Adhesive Curing Time
After installation, the adhesive requires a specific curing time, during which heavy foot traffic, furniture placement, and cleaning should be avoided. This curing period can range from 24 to 72 hours, depending on the adhesive type and environmental conditions, which can temporarily disrupt the use of the space.
E. Potential for Adhesive Odors
Some adhesives may emit volatile organic compounds (VOCs) and produce noticeable odors during and immediately after installation. While modern adhesives are increasingly low-VOC, proper ventilation is crucial during the installation process and for a period afterward to dissipate any lingering smells.

IV. The Installation Process: A Step-by-Step Guide
A. Pre-Installation Checklist
Before beginning, gather all necessary materials and tools. Ensure the LVT planks or tiles are acclimated to the room's temperature and humidity for at least 48 hours prior to installation. This prevents expansion or contraction after fitting.
B. Subfloor Preparation: The Most Crucial Step
This cannot be overstated: the subfloor must be immaculate.
- Cleaning: Thoroughly clean the subfloor, removing all dust, dirt, grease, and old adhesive.
- Leveling: Use a self-leveling compound or patch to fill any dips, cracks, or imperfections. The subfloor should be flat within 1/8 inch over 10 feet.
- Moisture Testing: Conduct moisture tests (e.g., calcium chloride test) to ensure the subfloor's moisture content is within the adhesive manufacturer's specifications. High moisture can lead to adhesive failure.
- Priming (if necessary): Some subfloors or adhesives may require a primer to improve adhesion.
C. Layout Planning
Careful planning minimizes waste and ensures a balanced appearance.
- Finding the Center: Mark the center of the room and draw perpendicular chalk lines to create quadrants. This helps ensure the pattern starts symmetrically.
- Dry Laying: Lay out a few rows of LVT without adhesive to visualize the pattern, plan cuts, and ensure that planks at the edges are not too narrow.
D. Adhesive Application
Follow the adhesive manufacturer's instructions precisely.
- Types of Adhesives: Common types include pressure-sensitive adhesives (PSAs), which remain tacky, and hard-set adhesives, which dry rigid. Choose the one recommended for your specific LVT.
- Trowel Size and Spread Rate: Use the correct notched trowel size to achieve the recommended spread rate, ensuring adequate adhesive coverage.
- Open Time vs. Working Time: Understand the adhesive's "open time" (how long it can be exposed before LVT is laid) and "working time" (how long you have to adjust planks after laying).
E. Laying the LVT Tiles/Planks
- Starting Point: Typically, start from the center lines and work outwards, or from a prominent wall.
- Technique: Lay each plank firmly into the wet adhesive, ensuring it's properly aligned with adjacent pieces. Avoid sliding planks, as this can push adhesive up through the seams.
- Ensuring Proper Alignment and Tight Seams: Use spacers if needed and press down firmly to ensure full contact with the adhesive.
- Cutting LVT: LVT can be easily cut with a utility knife and a straightedge. Score the plank and snap it.
F. Rolling the Floor
Immediately after laying a section, use a heavy floor roller (typically 75-100 lbs) to roll the entire installed area. This ensures maximum transfer of the adhesive to the LVT backing, removes air pockets, and creates a strong, uniform bond. Roll in multiple directions.
G. Curing Time and Post-Installation Care
- Traffic Restrictions: Restrict foot traffic for at least 24 hours and heavy traffic or furniture placement for 48-72 hours, as per adhesive manufacturer guidelines.
- Cleaning Up Adhesive Residue: Promptly clean any adhesive that seeps through seams or gets on the surface using a cleaner recommended by the adhesive manufacturer.
V. Tools and Materials Required
A. Essential Tools
- Tape Measure: For accurate measurements.
- Utility Knife & Blades: For cutting LVT planks/tiles.
- Straightedge: To guide the utility knife for straight cuts.
- Chalk Line: For marking layout lines on the subfloor.
- Notched Trowel: Specific size required for adhesive application.
- Floor Roller (75-100 lbs): Crucial for ensuring proper adhesive transfer.
- Hand Roller/J-Roller: For pressing down edges and small areas.
- Safety Gear: Gloves, knee pads, safety glasses.
- Mixing Paddle & Bucket: If using self-leveling compound.
- Moisture Meter/Test Kit: To check subfloor moisture.
B. Materials
- Glue Down LVT Planks/Tiles: The flooring material itself.
- Recommended Adhesive: Specific type and amount based on LVT and subfloor.
- Subfloor Patch/Leveler: For repairing imperfections.
- Primer (if needed): To enhance adhesion.
- Cleaning Supplies: For subfloor preparation and adhesive cleanup.
VI. Maintenance and Care for Glue Down LVT
A. Regular Cleaning
Maintaining glue-down LVT is straightforward.
- Sweeping/Vacuuming: Regularly sweep or vacuum (using a hard floor setting) to remove dirt and grit that can scratch the surface.
- Damp Mopping: Mop occasionally with a damp mop and a pH-neutral cleaner specifically designed for vinyl floors. Avoid excessive water.
B. Protecting Your Floor
- Furniture Pads: Place felt protectors under furniture legs to prevent scratches and dents.
- Walk-off Mats: Use doormats at entryways to trap dirt and moisture.
- Avoiding Harsh Chemicals: Do not use abrasive cleaners, wax, or steam mops, as these can damage the LVT finish or adhesive.
C. Dealing with Spills and Stains
Wipe up spills immediately to prevent staining. For stubborn stains, use a cleaner recommended by the manufacturer.
D. Repairing Damage
For minor scratches, a vinyl repair kit may suffice. For deeper damage or gouges, individual planks or tiles can be carefully removed by heating the adhesive (e.g., with a heat gun on a low setting) and prying them up, then replacing them with new ones.
VII. When to Choose Glue Down LVT: Ideal Scenarios
A. High-Traffic Residential Areas
For busy households with children, pets, or frequent entertaining, glue-down LVT offers the resilience needed to withstand constant wear and tear without gapping or shifting.
B. Commercial Spaces
Its stability and durability make it an excellent choice for commercial environments such as retail stores, offices, healthcare facilities, and restaurants, where heavy foot traffic and rolling loads are common.
C. Areas Prone to Moisture (e.g., basements, bathrooms, kitchens)
The enhanced water resistance provided by the adhesive bond makes glue-down LVT a reliable solution for areas where spills or moisture exposure are likely.
D. When Superior Stability and Durability are Paramount
If your top priorities are a floor that feels solid underfoot, won't move or buckle, and will last for decades, glue-down LVT is the optimal choice.
E. For Custom Design Patterns
If you envision intricate patterns like herringbone, basket weave, or custom inlays, the glue-down method provides the necessary stability and flexibility for these complex installations.
Conclusion
A. Recap of Key Benefits
Glue-down LVT flooring stands out as a premium choice for its exceptional stability, durability, water resistance, acoustic benefits, and design versatility. While it demands meticulous subfloor preparation and a more involved installation process, its long-term performance and ease of repair often outweigh these initial challenges.
B. Final Thoughts and Recommendation
For those seeking a robust, long-lasting, and aesthetically pleasing flooring solution that can withstand the rigors of daily life in both residential and commercial settings, glue-down LVT is an outstanding investment. Its ability to create a truly integrated and stable floor makes it a top contender for discerning homeowners and businesses alike.
C. Call to Action
Considering glue-down LVT for your next project? We highly recommend consulting with a professional flooring installer to assess your subfloor and ensure a flawless installation. Explore the vast array of designs and discover how glue-down LVT can transform your space.


 English
 中文简体
中文简体 русский
 Español


